What?
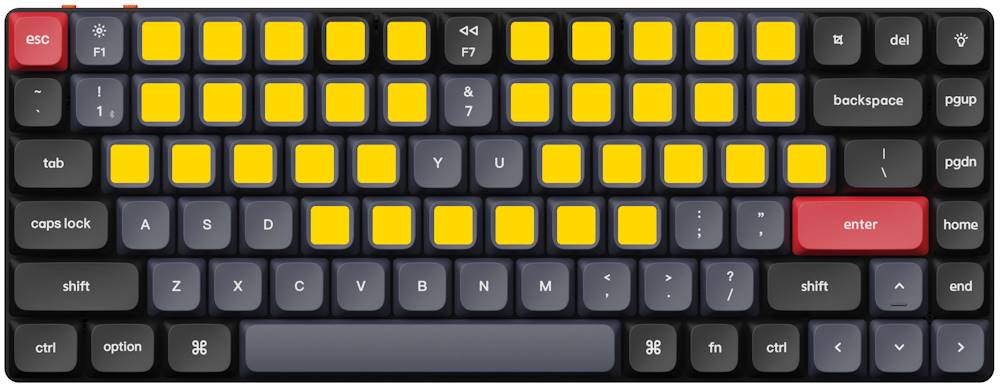
I have a Keychron K3 Pro ANSI keyboard and want to use the following subset of keys to try the Miryoku layout.
Updated on
I have a Keychron K3 Pro ANSI keyboard and want to use the following subset of keys to try the Miryoku layout.
As a guide I follow the Ubuntu/WSL track of the official tutorial.
Create a dedicated directory for QMK.
mkdir qmk && cd qmk
Create a new virtual environment—QMK CLI is a Python package, and I prefer to have isolated environments for Python tools.
python3 -m venv qmk-venv
Source the activate shell script to enter the
environment; to exit, type deactivate.
. qmk-venv/bin/activate
Install QMK CLI.
python3 -m pip install qmk
Change the default QMK home folder.
qmk config user.qmk_home=/home/ubuntu/qmk/firmware
Run the QMK setup. Here I point to the Keychron fork of the QMK repository.
qmk setup Keychron/qmk_firmware
Checkout the bluetooth_playground branch.
cd firmware && git checkout bluetooth_playground
Pull the submodules.
make git-submodule
Build the default firmware.
qmk compile -kb keychron/k3_pro/ansi/rgb -km default
keychron_k3_pro_ansi_rgb_default.bin in the current
directory.
Type explorer.exe . to open Windows File Explorer from
Ubuntu.
\\wsl.localhost\Ubuntu\home\ubuntu\qmk\firmware
Use Windows to flash firmware.
qmk_toolbox.exe is fine.
Toggle keyboard mode switch to Off, connect the keyboard, hold down the Esc and then toggle the switch to Cable.
STM32 DFU device connected (WinUSB): STMicroelectronics STM32 BOOTLOADER (0483:DF11:2200)
Click the Flash button. Wait.
Flash complete
STM32 DFU device disconnected (WinUSB):
STMicroelectronics STM32 BOOTLOADER (0483:DF11:2200)
Make sure that the virtual environment is activated and the correct directory is selected.
. ~/qmk/qmk-venv/bin/activate && cd ~/qmk/firmware
Create new keymap.
qmk new-keymap -kb keychron/k3_pro/ansi/rgb
manna-harbour_miryokuEdit the created keymap.
notepad.exe
              keyboards/keychron/k3_pro/ansi/rgb/keymaps/manna-harbour_miryoku/keymap.c
#define _____ KC_NO

#define LAYOUT_miryoku(\
  K00  ,  K01  ,  K02  ,  K03  ,  K04  ,          K05  ,  K06  ,  K07  ,  K08  ,  K09  ,\
  K10  ,  K11  ,  K12  ,  K13  ,  K14  ,          K15  ,  K16  ,  K17  ,  K18  ,  K19  ,\
  K20  ,  K21  ,  K22  ,  K23  ,  K24  ,          K25  ,  K26  ,  K27  ,  K28  ,  K29  ,\
  N30  ,  N31  ,  K32  ,  K33  ,  K34  ,          K35  ,  K36  ,  K37  ,  N38  ,  N39\
)\
LAYOUT_ansi_84(\
 _____ , _____ ,  K00  ,  K01  ,  K02  ,  K03  ,  K04  , _____ ,  K05  ,  K06  ,  K07  ,  K08  ,  K09  , _____ , _____ , _____ ,\
 _____ , _____ ,  K10  ,  K11  ,  K12  ,  K13  ,  K14  , _____ ,  K15  ,  K16  ,  K17  ,  K18  ,  K19  ,     _____     , _____ ,\
   _____   ,  K20  ,  K21  ,  K22  ,  K23  ,  K24  , _____ , _____ ,  K25  ,  K26  ,  K27  ,  K28  ,  K29  ,   _____   , _____ ,\
    _____    , _____ , _____ , _____ ,  K32  ,  K33  ,  K34  ,  K35  ,  K36  ,  K37  , _____ , _____ ,      _____      , _____ ,\
      _____      , _____ , _____ , _____ , _____ , _____ , _____ , _____ , _____ , _____ , _____ ,    _____    , _____ , _____ ,\
  _____  ,  _____  ,  _____  ,                      _____                      , _____ , _____ , _____ , _____ , _____ , _____\
)
Build the firmware.
qmk compile -kb keychron/k3_pro/ansi/rgb -km
              manna-harbour_miryoku
Caveat. In the keymap.c I defined what subset of keys on
the keyboard I want to use. The actual logic behind the layout is
located in the directory users/manna-harbour_miryoku/ and
this directory is part of the repository. Because I am using Keychron
fork of the QMK repository I might not have the latest version of the
Miryoku. Actually the QMK repository itself
might not contain
the latest version of the Miryoku. I am ok with that.